
| Introduction | Installation | First time Db schema Connection |
Operations Query Insert Repair Modify |
More about.... Using calibrations from Gleam |
Color key |
rdbGUI is a gui interface to a relational database. It was designed with the Calibration Metadata Database in mind, but could just as well be used to access any other MySQL database. With some extra work it could be extended to handle an Oracle or other rdbms as well.
Someday we plan to distribute rdbGUI as a stand-alone program, but for the time being it is most easily run from within the CMT environment. You will need the MySQL, Xerces and fox external libraries (along with their CMT interface packages MYSQLEXT, XMLEXT and FOX), and a few Glast-written packages.
If you're running on SLAC Linux, all the libraries you need are already available in the standard place for external libraries. Otherwise, you can find binaries at the SLAC ftp site. As of January 5, 2005, you need
Most GLAST developers will already have the correct version of xerces installed; many will also have mysql. At the ftp site there are three possibilities for fox 1.2.5 Linux binaries. fox-1.2.5_gcc-3.2.3.zip is recommended.
It's simplest to do a recursive checkout of rdbGuiRelease (currrent version is v1r5). (From MRvcmt, check it out, select it in the Packages Tree, then do Add to recursively add all the packages it uses.)
Next configure and build. On Windows make a Release build; you may encounter errors if you try a Debug build. Now you can start up rdbGUI just as you would any other executable built by CMT. It takes no arguments. You should see something like this
The very first time you bring up rdbGUI you will have to tell it where to find a description of the structure database you expect to use (what columns it has). After that it will assume you want to use the same description you used previously, though you will have an opportunity to tell it otherwise. Similarly, you will need to tell it how to connect to the rdbms server. For the Calibration Metadata Database, both kinds of information are kept in xml files in the xml subdirectory of rdbModel, so you just need to tell rdbGUI which files to use.
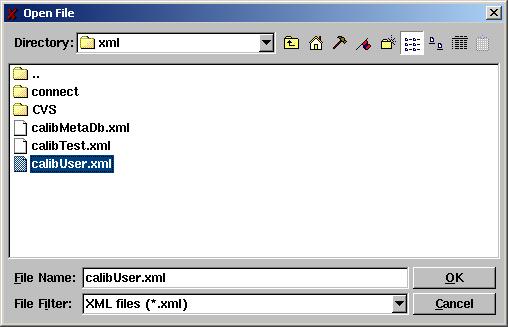
You must do this before you do anything else with rdbGUI. Click on File in the menu bar. The first item in the menu is Open DB Schema..; click on this. You will see an open file widget
The initial directory will be the one you started rdbGUI from. Most likely this will be the cmt directory of the rdbGui package, as in the screen shot. Use the controls (most of which should look familiar, but if not, put the mouse over the control and you'll see a tooltip, describing the purpose of the tool) to navigate to the xml directory of rdbModel.
Hint: before proceding further, you may want to bookmark the directory by clicking on the red pennant. Next time you start up rdbGui and need to select a db schema you will be able to go immediately to the bookmarked directory.
For development work, select calibUser.xml, as is shown here:
You should see the name metadata_v2r1 under Tables. Click on it and you will see all the columns in the table.
The next step is to specify various connection parameters: which database, on which node, which account, etc. Click on Session in the menu bar and select Open connection. Fill in the fields. profile name and profile description are just to help you remember what is in the profile. database name will be either calib (production database) or calib_user. The latter is an alternate database for developers of calibration algorithms or of code using calibrations. You can still get to these calibrations from Gleam. host:port is always centaurusa.slac.stanford.edu:0. username depends on what sort of access is needed: read only or read + write. At this point you may click Save so that in the future you can avoid retyping these parameters. Here is what the dialog might look like for a user wishing to create a profile for read-only access to the production database, calib, just before the password is typed in:
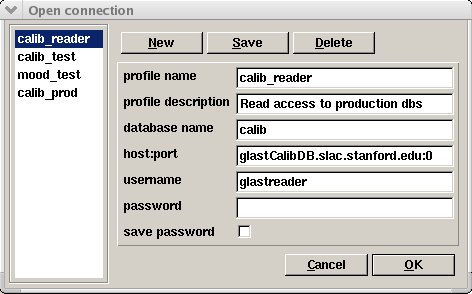
You can see names of saved profiles in the area to the left in the image above. The new parameters have been typed into the rightmost part of the window. For write access, use username calibrator. This screen shot shows a profile suitable for write access to the development database, calib_user. Ask Joanne about passwords.
To confirm that you are connected, click on the Log tab towards the bottom of the window. You should see messages indicating that everything is ok.
You must have successfully connected before attempting any of the following.
You query the database by specifying one or more conditions on columns in the table, then clicking Send. Each condition has the form
column-name comparison-operator literal-value
rdbGUI offers a choice of all defined column
names for the first field and all comparison
operators (<, = and so forth) for the second.
The way you supply the literal value (type it in, select one from a
set of offered choices, use a date widget,...) depends on
column-name.
You may add another condition by clicking More. Select which conjunction (AND or OR) should be used to connect the conditions. AND always takes precedence over OR; that is,
condition1 OR condition2 AND condition3
will be evaluated as
condition1 OR (condition2 AND condition3)
The results quickly show up in the Query output tab. You may use the check boxes to the left to suppress or make visible output of selected columns, however all are always fetched when you make a query.
You may use your mouse to select some entries from the query output, then click Copy to save the text to the clipboard.
Click on Action in the main window menu bar and select Insert. A new insert dialog window window will appear to allow you to set values for all columns which are the responsibility of the user, a slightly shorter list than the one in the leftmost part of the main window since some, like ser_no, will be set automatically by the MySQL server or by rdbGUI. Of these, some are purely informational or even unused, but others are essential. The most important ones are towards the top of the list. You should at least look at all of the columns listed below (critical ones are in red). Learn how to check and correct your new entry in the next section, Repair new entry.
It is very easy to not quite get it right when you insert a new entry in the database. The first thing you should do after the insert is make a query which will fetch the new entry (e.g., set a condition on ser_no which is sure to include it) and take a good, close look. Be sure to examine the data_ident field: it must be correct for the calibration to be used, and is also usually long and complicated, so easy to mistype. If there are any errors, you can repair them by clicking on Redo Last Insert in the Action menu. You will be presented with the same Insert dialog as before, except pre-filled with all the entries from your new row. You need only correct the errors, then submit the update.
You may belatedly discover an error in an entry (too late for the repair function described above) or you may have some other reason to modify a value or two in an existing entry. To do this, just make a query whose output includes the entry you want to modify. Then, in the Query output tab, right click on any part of the row and select the update row item that appears. You will get the same Insert dialog, with current values filled in. Modify as desired and submit.
This section has some background information and details which may be of interest to the regular user of rdbGUI
MySQL parameters: By default, Gleam uses the production calibration database called calib. If you want Gleam to access entries in calib_user you need to set the job options parameter CalibMySQLCnvSvc.DbName to "calib_user".
Columns: Certain of the columns have special meaning, particularly when accessing calibrations from Gleam for event processing. In that context, the idea is not to ever specify a particular calibration by name, but rather to specify certain qualities of the calibration, then use the database to look up the most appropriate calibration, based on those qualities. Gleam uses some columns to search for the calibration, and others (data_fmt and data_ident) to read in the corresponding data. The following table lists the search columns and how conditions on them are established:
| Name | Condition and how set |
|---|---|
| instrument | Column value must match internal program value (set by job option CalibDataSvc.CalibInstrumentName, defaults to "LAT") |
| calib_type | Must match type specified in (user-coded) TDS path to desired data; must be one of the supported types available in the list presented by rdbGUI |
| flavor | Must match flavor specified in (client-coded) TDS path to desired data. For some clients, like CalRecon, the end user may have to set client-specific job option parameters. Also, if not "vanilla", flavor must be among those in the value for the job options parameter CalibDataSvc.CalibFlavorList |
| (vstart,vend) or enter_time |
For default running, timestamp of event
must be within the interval demarcated by vstart and
vend. As the program cycles through events, their timestamps may
increase beyond vend, in which case a new calibration will be
fetched automatically. Alternatively, a special diagnostic mode may be selected by setting the job option parameter CalibMySQLCnvSvc.UseEventTime to false and setting a value for the parameter CalibMySQLCnvSvc.EnterTimeStart. In that case, vstart and vend will be ignored, but the search will attempt to find the calibration meeting all other conditions with enter_time as soon as possible after the value of the parameter. |
| proc_level | Must match one of PROD or DEV; it will try first for PROD. There is currently no way for users to modify this condition. |
| completion | Value must be OK. There is no way to modify this condition |
| program name | package name | user response | |
| Time-saving hint | Will be true in near future | Temporary; will change soon | Warning |
J. Bogart, M. Frailis, R. Giannitrapani
Last modified: